

After many months of hard work at team RTM, we are extremely pleased to present to you Raptoreum Testnet 4 which includes a plethora of improvements including Futures code and a huge codebase upgrade in many many thousands of lines of brand new code.
Yes we are a little late but our focus has been on the future and security of the chain. We intend on being around for a very long time and it is extremely important that our code mirrors the aspirations of the project. We thank our talented RTM developers for managing to move mountains to make this happen. Long Live RTM! Enjoy!! Mainnet is just around the corner >
RTM Testnet 4 User guide
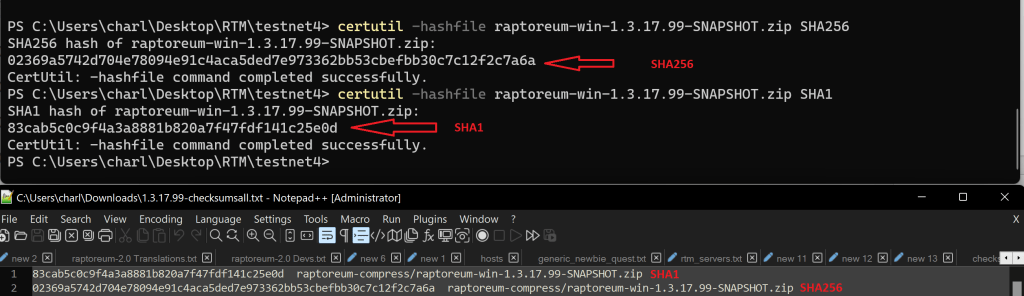
Important: The released files come with Checksums which you can use to verify the files have not been modified, you should always verify the files before running them! Checksums for SHA1 and SHA256 are available and you should check both, you can check the individual files or the entire package (zip or tar.gz).
Verifying packages on windows:
1.) Open Powershell in the directory where the downloaded file is (see below on how to do this).
2.) Download 1.3.17.99-checksumsall.txt
3.) Open the .txt in your text editor such as notepad.
4.) In Powershell type: certutil -hashfile raptoreum-win-1.3.17.99-SNAPSHOT.zip SHA256
5.) In Powershell type: certutil -hashfile raptoreum-win-1.3.17.99-SNAPSHOT.zip SHA1
6.) Compare the returned hashes to what you have for that file in 1.3.17.99-checksumsall.txt, they should match exactly.
Verifying packages on Linux and Mac is nearly the same, just change the commands to be (ubuntu 20 release as an example):
sha256sum raptoreum-ubuntu20-1.3.17.99-SNAPSHOT.tar.gz
sha1sum raptoreum-ubuntu20-1.3.17.99-SNAPSHOT.tar.gz
You can also follow the above process to check all the individual files if you like.
Testnet4 On Windows
- Download the testnet Windows wallet: <Click or Tap>
- Unzip the file
- Inside the folder where you see the wallet files (raptoreumd.exe, raptoreum-qt.exe, etc..) open Powershell by typing ‘powershell’ in the address bar and hit enter.
- In powershell type ‘.\raptoreum-qt.exe –testnet`, this will start the QT wallet.

![]()
Testnet4 On Linux/Mac (QT)
- Download the testnet wallet for your OS: <Click or Tap>
- Unpack the files
- Run raptoreum-qt: ./raptoreum-qt –testnet
Testnet4 on Linux/Mac (command line)
- Download the wallet for your OS: <Click or Tap>
- Unpack: tar -xvf <filename>
- Move into the directory which holds the wallet files.
- Run raptoreumd: ./raptoreumd –testnet –daemon
See below on using config files for testnet4.
Default data directory Windows: C:\Users\<user>\AppData\Roaming\RaptoreumCore\testnet4
Default data directory Linux/Mac: .raptoreumcore/testnet4
Default ports wallet/RPC: 10228/10229
wallet.dat files: Are now located inside the wallet folder > testnet4/wallets by default.
If you want the wallet or raptoreumd to use a specific configuration you can define that on start:
Windows: .\raptoreum-qt.exe –config=C:\Users\<user>\AppData\Roaming\RaptoreumCore\testnet4\raptoreum.conf –testnet
Linux: ./raptoreumd –config=/home/<user>/.raptoreumcore/testnet4/raptoreum.conf –testnet
Note: If specifying a raptoreum.conf location you also need to use that same raptoreum.conf if using raptoreum-cli:
Example: ./raptoreum-cli –config=/home/<user>/.raptoreumcore/testnet4/raptoreum.conf getnetworkinfo
testnet4/raptoreum.conf
To add or modify these settings in raptoreum.conf: addnode, connect, port, bind, rpcport, rpcbind and wallet
You must create a test section in raptoreum.conf and put them in that section or they will be ignored, example:
[test]
rpcport=10330
addnode=1.2.3.4