

Getting Started with Raptoreum Testnet Assets:
Initiating your journey with blockchain assets on Testnet is straightforward!
Download & install the Raptoreum Testnet Wallet from here: (GitHub)
When starting raptoreumd or raptoreum-qt you need to use the -testnet flag.
Starting on Windows Example
- Open a terminal or powershell in the directory where you have the executables.
- In terminal type .\raptoreum-qt.exe -testnet (you can also use –testnet)

Starting On Linux Example
To start QT:
./raptoreum-qt -testnet
To start raptoreumd:
./raptoreumd -testnet -daemon
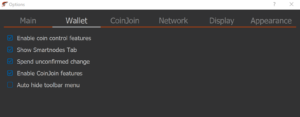
Showing the Toolbar
By default the wallet toolbar auto hides to the left hand side. If you prefer to have it visible at all times go to SETTINGS > OPTIONS > WALLET then uncheck Auto hide toolbar menu. Click OK then close the wallet and restart. You will now see the toolbar indefinitely.
If the Wallet Starts without any Peers
Click Window > Console > then copy each of the following lines, paste into the console and press enter after each one:
addnode 188.40.212.9:10229 add

addnode 88.198.6.234:10229 add

addnode 5.78.101.225:10229 add
Your wallet should now start syncing the headers and gaining more peers as time goes on.
If you want to Solo Mine some testnet Raptoreum Coins
Click Window > Console > then type out the following line but replace ‘threadcount’ with the number of CPU threads you would like to use to mine the testnet coins:
setgenerate true threadcount
Example:
setgenerate true 18
Your wallet should now start mining testnet coins, and after some time you will see them appear in the wallet.
If you dont wish to mine testnet coins, you can always join our Discord and request some from an admin here
Creating a New Asset
Creating a new Testnet asset is easy direct from your wallet, simply follow the steps below:
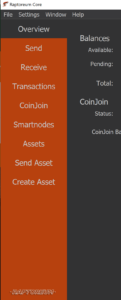
1) Select the Create Asset tab on the toolbar

2) Enter your Asset name, you can check on the right hand side if its available or if it has been taken already

3) Add an address that will be the Owner of the Asset you are creating. This address will need to hold some testnet coins in order to generate the asset. If you would like to make a new address for this purpose, then click Receive on the toolbar and type a name for your new address where it says Label. Then click request payment. A new address will be generated and added to your wallet address list in the table at the bottom of the page. You can now copy that address and paste into your Owner Address box on the Create Asset page.

4) Check the box to select if your asset will be unique (not updatable) or updatable in the future. Select this carefully because it will have implications on how people will judge your asset especially if you are building a project with Raptoreum Assets. As seen on EVM chains, and dependant on use case, users will generally prefer assets that are not updatable. When selecting unique assets such as NFT’s, step 5 below will be ghosted and not available. If you wish to create a mint of standard tokens, for example RaptorINU, that are not updatable, then leave both boxes unchecked.

5) With decimal point, you can select a number from 0 to 9. This will mean the asset you create will be divisible into smaller fractions depending on how many decimals you select. This is great for creating tokens with a small supply as you might like it to be divisible in smaller fractions if it is listed on markets or swap websites. Decimal points are not available for unique assets such as NFT’s.

6) Next is the Quantity. This number will be the total amount of Tokens minted for this brand new Asset that you are creating. For example: if i want to create an Asset with the supply of One Million (1,000,000) , then i would add 1000000 to the Quantity box.

7) Mint count is how many times you would like the quantity minted. So in the last step we added 1,000,000 quantity for our supply. For example: 1 Mint would be 1,000,000 issued. 2 mints would be 2,000,000 issued and so on. This is great when coupling with the upcoming issue frequency box which will mean you can release the assets gradually allowing many new use cases for both straight tokens and runs of NFT’s and more! Your max supply will be your quantity x mint count.

8) And finally the Target address is where you would like to hold the newly created assets when they are minted. If you need an address for this part, you can go back to step 3 to create a new address especially for this and paste into this box.
![]()
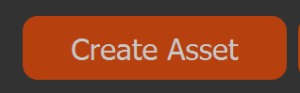
9) Thats it! Now click create asset at the bottom of the page to create your new Raptoreum Asset. If your wallet is encrypted with a password, you will be prompted to enter it at this stage
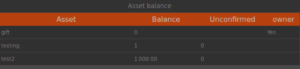
10) Your brand new Asset will now appear on the Assets tab on the Toolbar 🙂 See example below
11) After 1 block your asset will appear on chain and you are able select your Asset and click MINT. This will complete the process of Asset creation.
Sending an Asset
Sending an Asset is extremely simple by following the steps below:
a) Assuming you have successfully created your asset using the steps above, click Send Asset on the toolbar menu which will open up the Send Asset window.

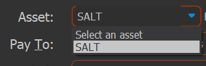
b) Select your minted Asset by clicking the small blue triangle which will show the drop down menu, then click on your chosen Asset. In the example Asset below, we have chosen SALT.
![]()
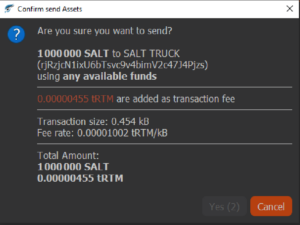
c) Next we choose where we would like to send the Asset by pasting in any Testnet Raptoreum address into the ‘Pay To’ field.

d) If the address is new to your wallet then you can give it a label in order to easily find it for another transaction you may want to send it in the future. In this case it is labelled ‘SALT TRUCK’

e) In the Amount field, now specify the quantity of the Asset you would like to send. In this case we added 1000000

f) Now click Send at the bottom left of the wallet window, and if you have encrypted your wallet, you will be requested to enter your password.

g) If your password is successful, or your wallet doesn’t have a password, you will see the following window popup. Check the information displayed to make sure it is correct, and after 5 seconds, you are now able to click Yes which will complete the sending of your Asset to your chosen address.
Syncing Raptoreum Testnet
There has been substantial improvements to syncing such as adding multi-threading support for block header processing. We encourage people to sync without the bootstrap for testing. With how fast sync is now, using the bootstrap is not going to save you much in time, it may even be slower.
Testnet Data Location and Ports
Default data directory Windows: C:\Users\<user>\AppData\Roaming\RaptoreumCore\nodetest
Default data directory Linux/Mac: .raptoreumcore/nodetest
Default ports wallet/RPC: 10228/10229
wallet.dat files: Are now located inside the wallet folder > nodetest/wallets by default.
Testnet explorer: https://testnet.raptoreum.com/
At this early stage of Testnet, RPC’s that are available are as follows:
assetdetails 'asset_id or asset_name'
createasset asset_metadata
listassetsbalance
listunspentassets ( minconf maxconf ["addresses",...] [include_unsafe] [query_options])
mintasset txid
sendasset "asset_id" "qty" "to_address" "change_address" "asset_change_address"
createrawtransaction
Remaining RPCSs will be available when transaction decoupling is released on testnet.
You’ll also find available tasks in the #bounties channel at our Discord server, offering Raptoreum rewards upon completion.
Having trouble with Apple Silicon MAC OSX install? Follow this guide:
Step 1: Download the Wallet
- Navigate to the Raptoreum GitHub releases page by clicking on the following link: Raptoreum Releases
- Download the wallet version for Mac OSX.
Step 2: Extract the Wallet Files
- Create a new folder on your desktop.
- Use a popular unzip tool like Winzip or Rar to extract the downloaded wallet files into your newly created folder.
Step 3: Make the QT Wallet Executable
- Open the Terminal app on your Mac.
- Use the cd command to navigate to the directory containing the wallet file you want to make executable. Replace YourScriptDirectory with the actual directory name.
shell


Copy code% cd YourScriptDirectory
- Enter the chmod command to make the wallet file executable. Replace YourScriptName.sh with the actual name of the wallet file.
shell


Copy code% chmod 755 YourScriptName.sh
Step 4: Configure for Testnet
- To run the wallet in testnet mode, you need to ensure that you can see hidden files in your file system.
- Open Finder and click on “Settings” or “Preferences.”
- In the Finder Preferences window, check the “Show all filename extensions” and “Show warning before changing an extension” options. Also, check the “Show Hard Disks” option.
Step 5: Start the Wallet in Testnet Mode
- Run the wallet in Mainnet once and make note of the installation path.
- As soon as you start syncing in Mainnet, close the wallet.
- Navigate to your desktop.
- Click on the hard disk where you installed the wallet.
- If you have trouble accessing the default installation path, you can use the keyboard shortcut command + shift + . (period) to show hidden files.
- Locate and open the Raptoreum.conf file using a text editor.
- In the Raptoreum.conf file, add the following line to specify testnet mode:
makefile


Copy codetestnet = 1
- Save and close the Raptoreum.conf file.
- Click on the wallet executable file again to run it.
Congratulations!
You have successfully installed and are now running Raptoreum Assets Testnet on your Mac OSX with Apple Silicon. Enjoy using Raptoreum in testnet mode!
What will YOU build?